Maintaining your Hobart slicer sharpener is crucial to ensure optimal performance and safety in your kitchen.
However, there may come a time when you need to remove the sharpener for cleaning, maintenance, or replacement.
We will guide your step-by-step process to Remove and reinstall your Hobart slicer sharpener and blade.
- Step-by-step guide for Remove & reinstall the Hobart Slicer blade:
- Step 1: Preparation:
- Step 2: Accessing the Sharpener:
- Step 3: Removing the Blade Cover (If Necessary):
- Step 4: Loosening the Retaining Screws or Bolts:
- Step 5: Detaching the Sharpener:
- Step 6: Cleaning and Maintenance (Optional):
- Step 7: Reinstallation of Meat Slicer (If Necessary):
- Step 8: Reattaching the Blade Cover (If Removed):
- Step 9: Testing the Hobart Meat Slicer:
- Step 10: Final Checks a Meat Slicer:
- Sharpening the blade of a Hobart Slicer:
- Safety tips for sharpening the Hobart slicer:
- Conclusion:
- FAQs About How to Remove the Hobart Meat Slicer Sharpener and Blade
Step-by-step guide for Remove & reinstall the Hobart Slicer blade:
Step 1: Preparation:
Before you begin, ensure that the slicer is turned off and unplugged from the power source to avoid any accidents.
It’s also a good idea to gather the necessary tools for the job, including a screwdriver, wrench, and cleaning supplies if you plan to clean the sharpener during removal.
Step 2: Accessing the Sharpener:
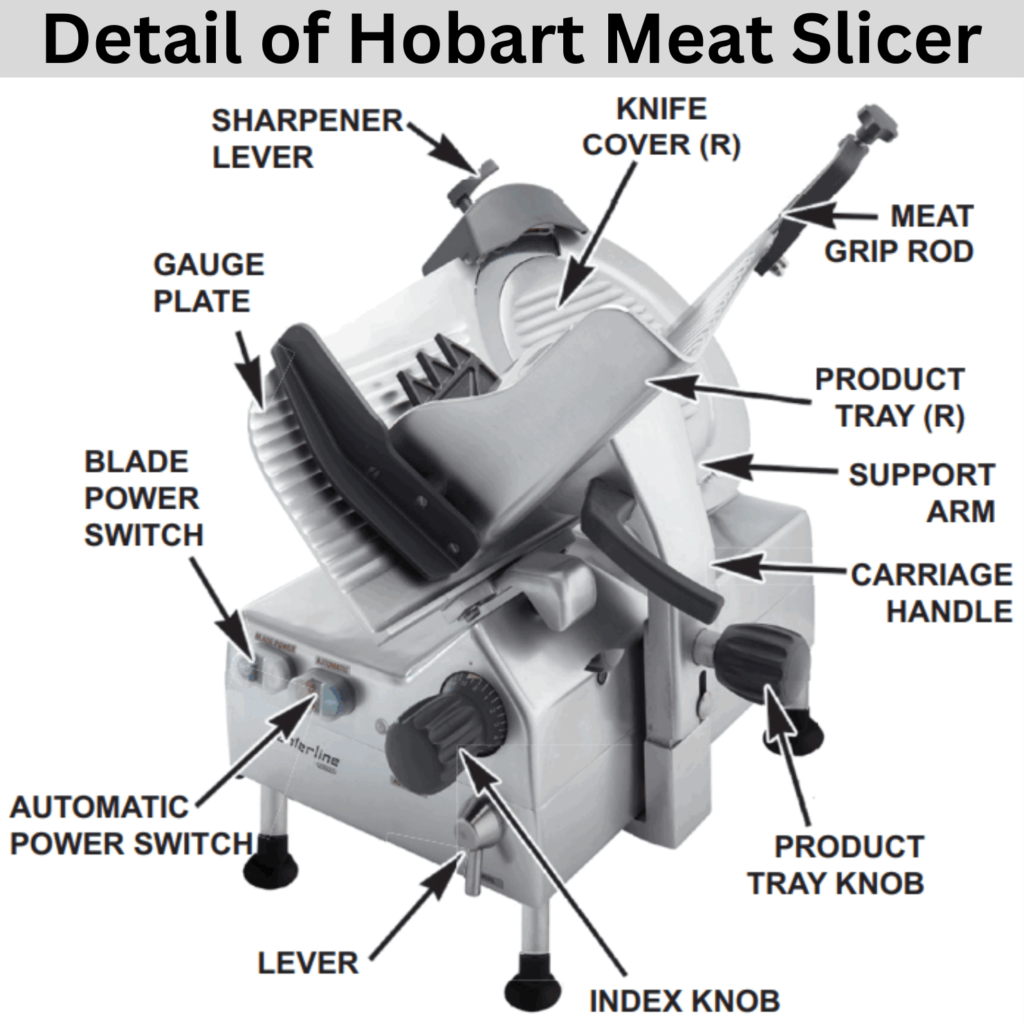
Locate the sharpener on your Hobart slicer. It is typically positioned near the blade, either on the top or side of the slicer, depending on the model.
Once you’ve located the sharpener, assess how it is attached to the slicer. Most sharpeners are held in place with screws or bolts.
Step 3: Removing the Blade Cover (If Necessary):

In some models, there may be a blade cover that needs to be removed before accessing the sharpener. Use a screwdriver to loosen and remove any screws securing the blade cover in place.
Carefully lift off the blade cover of the slicer and set it aside.
Step 4: Loosening the Retaining Screws or Bolts:
Using the appropriate tool, whether it’s a screwdriver or wrench, begin loosening the retaining screws or bolts that secure the sharpener to the slicer.
These screws or bolts may be located on the top or bottom of the sharpener housing. Take care not to lose any screws or bolts during this process.
Step 5: Detaching the Sharpener:

Once the retaining screws or bolts are loosened, gently lift the sharpener away from the slicer. Be cautious not to damage any surrounding components or wiring during removal.
If the sharpener seems stuck, double-check that all screws or bolts have been adequately loosened before applying more force.
Step 6: Cleaning and Maintenance (Optional):
With the sharpener removed, now is an excellent opportunity to clean and perform any necessary maintenance.
Use a soft cloth or brush to remove any debris or buildup from the sharpener and surrounding areas. If the sharpener blades are dull or damaged, consider sharpening or replacing them as needed.
Step 7: Reinstallation of Meat Slicer (If Necessary):
Once cleaning and maintenance tasks are complete, it’s time to reinstall the sharpener. Carefully position the sharpener back onto the slicer, ensuring that it aligns properly with any mounting holes or guides. Then, tighten the retaining screws or bolts to secure the sharpener in place.
Step 8: Reattaching the Blade Cover (If Removed):
If you removed a blade cover earlier, now is the time to reattach it. Line up the cover with its original position and secure it in place using the screws you removed earlier.
Ensure that the cover is firmly attached and that there are no gaps or loose screws.
Step 9: Testing the Hobart Meat Slicer:
Before using the slicer again, it’s essential to perform a quick test to ensure that the sharpener is working correctly and that all components are securely in place.
Plug in the slicer, turn it on, and activate the sharpener according to the manufacturer’s instructions.
Step 10: Final Checks a Meat Slicer:
Once you’ve confirmed that the sharpener is functioning correctly, take a moment to double-check all screws, bolts, and components to ensure they are properly tightened and aligned.
This extra step can help prevent accidents and ensure the longevity of your slicer and sharpener.
Sharpening the blade of a Hobart Slicer:
Hobart slicer is a crucial maintenance task to ensure precise slicing and safe operation. Here’s a concise guide on how to sharpen the blade effectively:
- Preparation: Before you begin sharpening, ensure that the slicer is turned off and unplugged from the power source. This precaution is essential to prevent accidents while handling the blade.
- Remove the Blade: Depending on your Hobart slicer model, you may need to remove the blade for sharpening. Follow the manufacturer’s instructions for safely removing the blade. Typically, this involves loosening the blade retaining screws or bolts, and carefully lifting the blade away from the slicer.
- Choose the Right Sharpener: Select a suitable sharpening tool for your blade. You can use a sharpening stone, honing rod, or electric sharpener designed specifically for slicer blades. Ensure that the sharpener’s grit matches the level of dullness on your blade.
- Sharpening Technique: Hold the sharpener firmly and position it against the blade at the correct angle. The ideal angle for sharpening a slicer blade is typically around 20 to 30 degrees. Using light pressure, glide the sharpener along the entire length of the blade, moving in a consistent motion from the base to the tip.
- Repeat as Needed: Depending on the condition of your blade, you may need to repeat the sharpening process several times to achieve the desired sharpness. Check the blade periodically during sharpening to assess its sharpness and adjust your technique as necessary.
- Honing (Optional): After sharpening, you can further refine the blade’s edge by honing it with a honing rod or fine-grit sharpening stone. This step helps to remove any burrs and ensures a smooth, sharp edge.
- Reassemble the Meat Slicer: Once you’re satisfied with the sharpness center of the blade, carefully reassemble the slicer following the manufacturer’s instructions. Ensure that all components are securely tightened and aligned before using the slicer again.
- Test the Blade: Before slicing any food, perform a quick test to ensure that the blade is sharp and cutting smoothly. Adjustments may be necessary if the blade does not meet your expectations.
Safety tips for sharpening the Hobart slicer:
By following these safety tips, you can minimize the risk of accidents and ensure a safe sharpening process for your Hobart slicer.
- Wear Protective Gear: Always wear cut-resistant gloves and safety goggles to protect your hands and eyes from potential injuries.
- Power Off: Ensure that the slicer is turned off and unplugged from the power source before attempting to sharpen the blade to prevent accidental starts.
- Secure Work Area: Work in a clean, well-lit area with ample space to maneuver the sharpener and blade safely.
- Proper Handling: Handle the blade and sharpener with care, avoiding any sudden movements or excessive force that could lead to accidents.
- Correct Angle: Maintain the correct sharpening angle recommended by the manufacturer to achieve optimal results and prevent damage to the blade.
- Stable Base: Ensure that the slicer and sharpener are placed on a stable surface to prevent them from tipping over during sharpening.
- Inspect Equipment: Before sharpening, inspect the sharpener and blade for any damage or defects that could affect safety or performance.
- Follow Instructions: Always follow the manufacturer’s instructions for sharpening the blade to avoid damaging the equipment or compromising safety.
- Keep Children Away: Keep children and pets away from the work area to prevent accidents or distractions while sharpening the blade.
- Cool Down: Allow the blade to cool down completely before reassembling the slicer to avoid burns or injuries from hot components.
Conclusion:
Removing and reinstalling the sharpener on your Hobart slicer may seem daunting at first, but with the right tools and guidance, it’s a straightforward process.
By following the step-by-step instructions outlined above, you can safely and effectively maintain your slicer sharpener, ensuring optimal performance and safety in your kitchen for years to come.
FAQs About How to Remove the Hobart Meat Slicer Sharpener and Blade
How often should I sharpen the blade?
It depends on your usage frequency and the type of food you slice. Generally, it’s recommended to sharpen the blade every 24 to 40 hours of use for optimal performance.
Can I use any sharpening tool for the blade?
It’s best to use sharpening tools specifically designed for slicer blades to ensure proper sharpening and avoid damaging the blade.
How do I know when the blade needs replacement?
Signs that indicate the blade needs replacement parts include excessive wear, nicks, or dullness that cannot be restored through sharpening. Additionally, if the blade no longer produces clean cuts or starts to tear food, it may be time for a replacement.
Can I clean the slicer blade with water?
It’s recommended to avoid using warm soapy water directly on the blade as it can cause rusting. Instead, use a clean cloth or sponge to wipe down the blade after use, and thoroughly dry it to prevent moisture buildup.
How do I maintain the slicer’s overall condition?
Regular cleaning, lubrication of moving parts, and inspection for any signs of wear or damage are essential for maintaining the slicer’s performance and longevity.
Is it safe to disassemble the slicer for cleaning?
Yes, but ensure that the slicer is powered off and unplugged before disassembling any parts. Follow the manufacturer’s instructions for proper disassembly and reassembly to avoid damaging the slicer or compromising safety.